![]()
Verified AD0-E716 Exam Dumps PDF [2026] Access using Actual4dump
Try Best AD0-E716 Exam Questions from Training Expert Actual4dump
NEW QUESTION # 15
A new customer registered on the Integration environment of an Adobe Commerce Cloud project but did not receive a welcome email What would be blocking the email from being sent?
- A. The Outgoing Emails setting is disabled into Environment Settings in the Project Web Interface.
- B. On all Integration environments, email is always disabled.
- C. SendGrid has not been configured for this environment.
Answer: A
Explanation:
The reason why the new customer did not receive a welcome email is that the Outgoing Emails setting is disabled in the Environment Settings in the Project Web Interface. This setting controls whether emails are sent from the application or not. By default, this setting is disabled for integration environments to prevent spamming or testing emails from being sent to real customers or recipients. The developer can enable this setting if they want to test email functionality on integration environments. Verified References: [Magento 2.4 DevDocs]
NEW QUESTION # 16
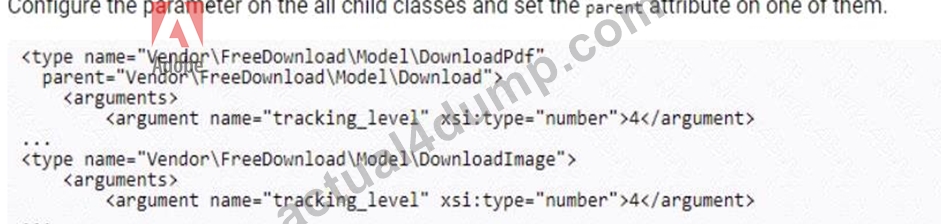
An Adobe Commerce developer is asked to change the tracking level on a custom module for free downloading of pdf and images.
The module contains following models:
Vendor\FreeDownload\Model\Download
Vendor\FreeDownload\Model\DownloadPdf extends Vendor\FreeDownload\Model\Download Vendor\FreeDownload\Model\DownloadImage extends Vendor\FreeDownload\Model\Download Download class has a parameter for tracking_level.
How will the developer configure the tracking_level parameter, in di.xml.to have a value of 4 for Download class and all classes that extend Download?
- A.

- B.
- C.

Answer: B
Explanation:
To configure the tracking_level parameter in di.xml to have a value of 4 for the Download class and all classes that extend Download, the developer would use the following code:
<config>
<global>
<models>
<Vendor\FreeDownload\Model\Download>
<setting name="tracking_level" value="4"/>
</Vendor\FreeDownload\Model\Download>
<Vendor\FreeDownload\Model\DownloadPdf>
<rewrite name="tracking_level" value="4"/>
</Vendor\FreeDownload\Model\DownloadPdf>
<Vendor\FreeDownload\Model\DownloadImage>
<rewrite name="tracking_level" value="4"/>
</Vendor\FreeDownload\Model\DownloadImage>
</models>
</global>
</config>
The setting element is used to set a configuration value for a specific model. The rewrite element is used to override the default configuration value for a specific model. In this case, the tracking_level parameter is set to
4 for all models that extend Download.
NEW QUESTION # 17
A merchant is experiencing performance issues on integration environments of their Adobe Commerce Cloud Pro plan and wants to upgrade to Enhanced Integration Environments.
What are the steps necessary prior to redeploying in order to upgrade to Enhanced Integration Environments?
- A. 1. Limit the number of Integration branches to three
2. Set the ENV.ENVIRONMENT in .magento.env.yaml to ENHANCEDJNTEGRATION - B. 1. Limit the number of Integration branches to four
2. Configure integration environments in the cloud GUI and set the Enhanced switch to On - C. 1. Limit the number of Integration branches to two
2. Submit a support ticket requesting the upgrade
Answer: C
Explanation:
The steps necessary prior to redeploying in order to upgrade to Enhanced Integration Environments are to limit the number of integration branches to two and to submit a support ticket requesting the upgrade.
Enhanced Integration Environments are an improved version of integration environments that offer better performance, stability, and security. They have a limit of four active branches at a time, but only two branches can be migrated from standard integration environments. The developer needs to delete or deactivate any extra branches before requesting the upgrade from Adobe support. Verified References: [Magento 2.4 DevDocs]
NEW QUESTION # 18
An Adobe Commerce developer has created a module that adds a product attribute to all product types via a Data Patch-According to best practices, how would the developer ensure this product attribute is removed in the event that the module is uninstalled at a later date?
- A. Add an Uninstall.php file extending \l1agento\Framework\Setup\UninstallInterface tO the module's Setup directory and implement the uninstall method.
- B. Make the Data Patch implement \Magento\Framework\setup\Patch\PatchRevertabieinterface and implement the revert method to remove the product attribute.
- C. Add instructions to the module's README.md file instructing merchants and developers that they must manually remove this attribute if they want to uninstall the module.
Answer: B
Explanation:
According to the Develop data and schema patches guide for Magento 2 developers, data patches can also implement PatchRevertabieinterface to provide rollback functionality for their changes. The revert() method contains the instructions to undo the data modifications made by the patch. To ensure that the product attribute is removed when the module is uninstalled, the developer should make the data patch implement PatchRevertabieinterface and implement the revert method to remove the product attribute using EavSetupFactory or AttributeRepositoryInterface. Verified References: https://devdocs.magento.com/guides
/v2.3/extension-dev-guide/declarative-schema/data-patches.html
NEW QUESTION # 19
An Adobe Commerce developer is tasked to add a file field to a custom form in the administration panel, the field must accept only .PDF files with size less or equal than 2 MB. So far the developer has added the following code within the form component xml file, inside the fieldset node: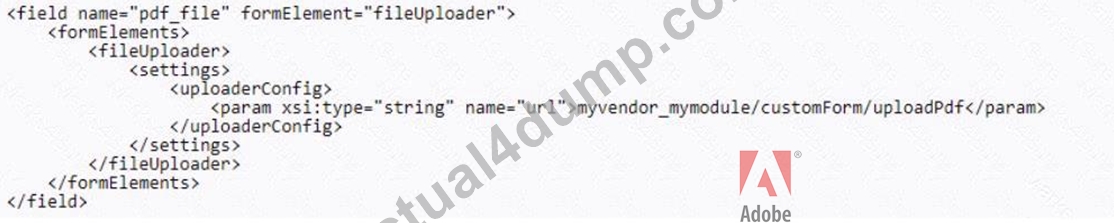
How would the developer implement the validations?
A)
Add the Validations Within the HyVendor\MyModule\Controller\Adminhtml\CustomEntity\UploadPdf Controller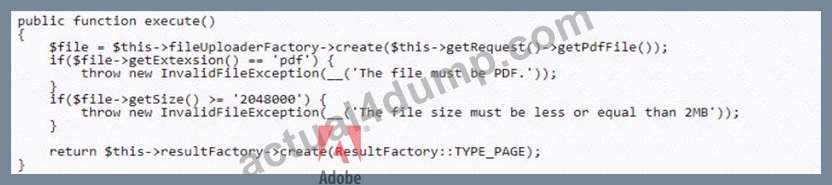
B)
Add a virtual type forMyvendor\MyModuie\Modei\customPdfupioader specifying the aiiowedExtensions and the maxFiiesize for the constructor, within the module's di.xmi:
C)
Add the following code inside the<settings> node:
- A. Option B
- B. Option C
- C. Option A
Answer: A
Explanation:
The developer can add a virtual type for Myvendor\MyModuie\Modei\customPdfupioader specifying the aiiowedExtensions and the maxFiiesize for the constructor, within the module's di.xmi. This way, the developer can reuse the existing file uploader class and customize it for the specific field without modifying the core code. Verified References: [Magento 2.4 DevDocs] [Magento Stack Exchange]
NEW QUESTION # 20
How would a developer turn on outgoing emails on an Adobe Commerce Cloud Staging environment?
- A. Access the Project Web Interface and select the Staging environment.
Select Configure environment.
Toggle Outgoing emails On - B. From the command line
ece-tools enable_smtp true - C. From the command line
magento-cloud environment:info -p <project-id> -e <environment-id> enable_smtp true
Answer: A
Explanation:
The developer can turn on outgoing emails on an Adobe Commerce Cloud Staging environment by accessing the Project Web Interface and selecting the Staging environment. Then, the developer can select Configure environment and toggle Outgoing emails On. This will enable the SMTP service for the Staging environment and allow emails to be sent from the application. Verified References: [Magento 2.4 DevDocs] 1
NEW QUESTION # 21
There is the task to create a custom product attribute that controls the display of a message below the product title on the cart page, in order to identify products that might be delivered late.
The new EAV attribute is_delayed has been created as a boolean and is working correctly in the admin panel and product page.
What would be the next implementation to allow the is_delayed EAV attribute to be used in the .phtml cart page such as $block->getProduct()->getIsDelayed()?
A)
Create a new file etc/catalog_attributes.xmi:
B)
Create a new file etc/extension attributes.xmi:
C)
Create a new file etc/eav attributes.xmi:
- A. Option B
- B. Option C
- C. Option A
Answer: C
Explanation:
To allow the is_delayed EAV attribute to be used in the .phtml cart page, the developer needs to create a new file called etc/catalog_attributes.xmi. This file will contain the definition of the is_delayed attribute.
The following code shows how to create the etc/catalog_attributes.xmi file:
XML
<?xml version="1.0"?>
<catalog_attributes>
<attribute code="is_delayed" type="int">
<label>Is Delayed</label>
<note>This attribute indicates whether the product is delayed.</note>
<sort_order>10</sort_order>
<required>false</required>
</attribute>
</catalog_attributes>
Once the etc/catalog_attributes.xmi file has been created, the is_delayed attribute will be available in the .
phtml cart page. The attribute can be accessed using the getIsDelayed() method of the Product class.
PHP
$product = $block->getProduct();
$isDelayed = $product->getIsDelayed();
The isDelayed variable will contain the value of the is_delayed attribute. If the value of the attribute is 1, then the product is delayed. If the value of the attribute is 0, then the product is not delayed.
NEW QUESTION # 22
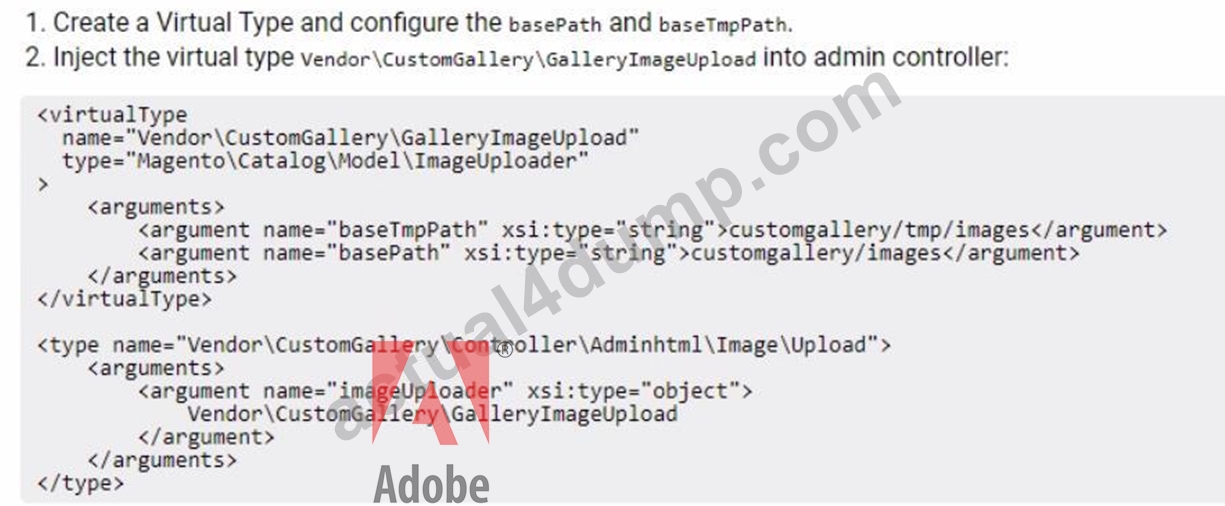
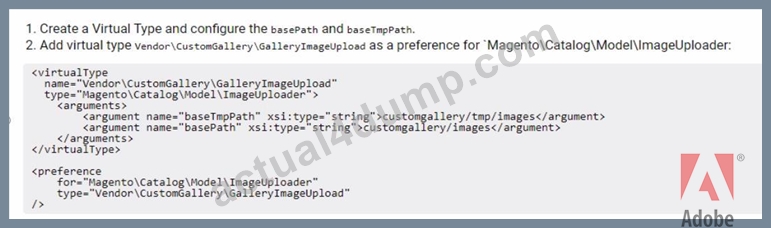
An Adobe Commerce developer is working on a custom gallery extension.
The module uses the Magento\catalog\Model\iinageUploader class for image uploading. The admin controller for custom image uploads is Vendor\CustomGallery\Controller\Adminhtml\Image\Upload.
The images need to be stored in different basePath and baseTmpPath than the default ones.
How can the default imageuploader class be extended and used without affecting the other modules that are already using it?
- A.
- B.
- C.
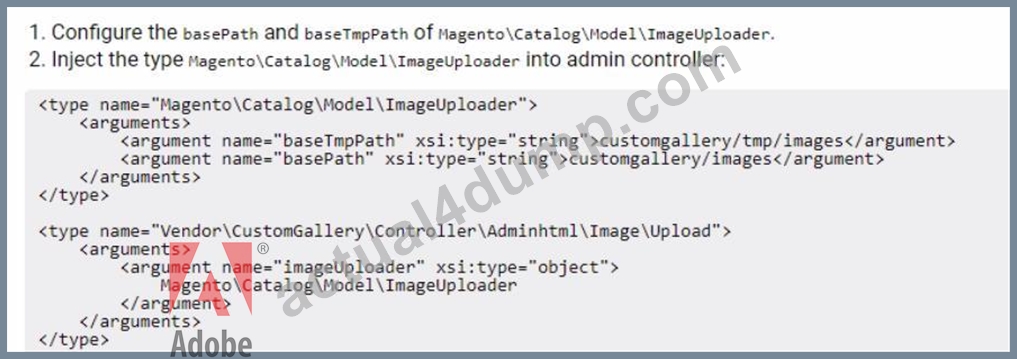
Answer: A
Explanation:
To extend the Magento\Catalog\Model\ImageUploader class and configure it with custom basePath and baseTmpPath without affecting other modules that utilize this class, the best approach is to use a Virtual Type
. Virtual types allow you to create a customized version of a class for a specific context without altering the original class or its usage elsewhere.
Option A is correct for the following reasons:
* Creating a Virtual Type:By defining a virtual type (Vendor\CustomGallery\GalleryImageUpload) in the di.xml, you create a custom version of the ImageUploader class. This virtual type can have unique configurations for basePath and baseTmpPath, which are specific to the custom gallery module.
* Explanation: Virtual types are particularly useful in Magento when you need to use a slightly modified version of an existing class in a specific context. In this case, the virtual type allows you to define custom paths without altering the base ImageUploader class, ensuring that other modules using ImageUploader are unaffected.
* References: Magento's developer documentation on dependency injection and virtual types highlights this pattern for customizing class behavior in a contained and non-intrusive manner.
* Injecting the Virtual Type into the Admin Controller:The custom virtual type is then injected into the Vendor\CustomGallery\Controller\Adminhtml\Image\Upload controller. This ensures that only this controller uses the modified version with the custom paths, leaving other instances of ImageUploader to function with their default settings.
* Explanation: By explicitly injecting the virtual type into the controller, you localize the configuration changes to only the desired functionality. This approach is efficient and maintains module independence, a key principle in Magento development.
Options B and C are incorrect for the following reasons:
* Option B directly modifies Magento\Catalog\Model\ImageUploader with the new paths. This change will affect all usages of the ImageUploader class across the site, which contradicts the requirement to avoid impacting other modules.
* Option C involves creating a virtual type and then setting it as a preference. However, using a preference would replace all instances of ImageUploader across the entire Magento application, leading to the same issue as Option B.
NEW QUESTION # 23
An Adobe Commerce developer is developing a custom module. As part of their implementation they have decided that all instances of their Custom\Module\Model\Example class should receive a new instance of Magento\Filesystem\Adapter\Local.
How would the developer achieve this using di. xml?
- A.

- B.

- C.

Answer: A
Explanation:
The developer can achieve this by adding the following configuration to their di.xml file:
XML
<config>
<component name="Custom\Module\Model\Example" factory="Custom\Module\Model\ExampleFactory">
<arguments>
<argument name="filesystemAdapter" type="Magento\Filesystem\Adapter\Local" />
</arguments>
</component>
</config>
This configuration will ensure that all instances of the Custom\Module\Model\Example class will receive a new instance of the Magento\Filesystem\Adapter\Local class.
NEW QUESTION # 24
An Adobe Commerce developer is creating a module (Vendor.ModuleName) to be sold on the Marketplace.
The new module creates a database table using declarative schema and now the developer needs to make sure the table is removed when the module is disabled.
What must the developer do to accomplish this?
- A. Add a schema patch that implements Magento\Framework\setup\Patch\PatchRevertabieinterface and drops the table in the revert function.
- B. There is nothing further the developer needs to do. The table will be removed when the when bin
/magento module:uninstall vendor_ModuleName is run. - C. There is nothing further the developer needs to do. The table will be removed when the module is disabled and bin/magento setup:upgrade is run.
Answer: B
Explanation:
In Adobe Commerce (Magento), when a module is uninstalled using the bin/magento module:uninstall command, Magento automatically handles the cleanup of database tables created by that module. This is part of Magento's built-in mechanism for managing module lifecycle events.
* Declarative Schema and Table Removal:
* With the declarative schema, Magento automatically creates and removes tables when modules are installed or uninstalled.
* Using the command bin/magento module:uninstall, Magento removes any database schema associated with the module, including custom tables, as defined in the declarative schema.
* No Additional Steps Required:
* Since Option B leverages the module:uninstall command, it automatically handles the table removal process without additional code or configuration.
* Option A is incorrect because setup:upgrade does not remove the table on its own, it only updates the schema.
* Option C, while a valid approach to explicitly revert a change, is unnecessary here due to Magento's built-in uninstall functionality.
* References:
* Magento DevDocs on Declarative Schema
* Adobe Commerce documentation on Module Uninstallation
NEW QUESTION # 25
A developer wants to deploy a new release to the Adobe Commerce Cloud Staging environment, but first they need the latest code from Production.
What would the developer do to update the Staging environment?
- A. 1. Log in to the Project Web Interface.
2. Choose the Staging environment, and click Merge - B. 1. Checkout to Production environment
2. Use the magento-cloud synchronize <environment-ID> Commerce CLI Command - C. 1. Log in to the Project Web Interface.
2. Choose the Staging environment, and click Sync
Answer: C
Explanation:
The developer can update the Staging environment with the latest code from Production by logging in to the Project Web Interface, choosing the Staging environment, and clicking Sync. This will synchronize the code, data, and media files from Production to Staging, creating an exact copy of Production on Staging. The developer can then deploy the new release to Staging and test it before pushing it to Production. Verified References: [Magento 2.4 DevDocs]
NEW QUESTION # 26
An Adobe Commerce developer is asked to create a new payment method for their project. This project has administrators who use the backend to manage customer information and occasionally place orders. When testing the new payment method on the frontend everything worked as expected, however, the payment method is missing in the admin.
What is a possible reason for this?
- A. In the module di.xml, there were no default 3DS verification types configured as a VirtualType.
- B. In the module config.xmi, the boolean value for can_capture was set to false.
- C. In the module config.xmi, the node can_use_internal was not set to true.
Answer: C
NEW QUESTION # 27
An Adobe Commerce Developer is tasked with creating a custom form which submits its data to a frontend controller They have decided to create an action and have implemented the
\Magento\Framework\App\Action\HttpPostActioninterface class, but are not seeing the data being persisted in the database, and an error message is being shown on the frontend after submission.
After debugging and ensuring that the data persistence logic is correct, what may be cause and solution to this?
- A. Magento does not allow POST requests to a frontend controller, therefore, the submission functionality will need to be rewritten as an API endpoint.
- B. Form key validation runs on all non-AJAX POST requests, the developer needs to add the for_key to their requests.
- C. The developer forgot to implement a validatePostDataQ method in their action. They should implement this method: all non-validated POST data gets stripped out of the request and an error is thrown.
Answer: B
Explanation:
According to the Magento Stack Exchange answer, form key validation is a security feature that prevents CSRF attacks by checking if the form key in the request matches the one generated by Magento. If the developer does not include the form_key in their custom form, the validation will fail and an error will be shown. Therefore, the developer needs to add the form_key to their requests by using <?=
$block->getBlockHtml ('formkey') ?> in their template file. Verified References:
https://magento.stackexchange.com/questions/95171/magento-2-form-validation
NEW QUESTION # 28
An Adobe Commerce developer has installed a module from a third-party vendor. This module fires a custom event named third_party_event_after and also defines an observer named third_party_event_after_observer that listens to that event. The developer wants to listen to this custom event in their own module but wants to execute their observer's logic after the third_party_event_after_observer observer has finished executing.
What would the developer do to ensure their observer runs after the observer defined by the third-party module?
- A. This is not possible as observers listening to the same event may be invoked in any order.
- B. Set the sort order of the new observer to be less than that of the third-party vendor's observer.
- C. Ensure the third-party module is listed in the <sequence> node of the developer's module.xmi file.
Answer: B
Explanation:
To ensure that the developer's observer runs after the observer defined by the third-party module, they need to set the sort order of the new observer to be less than that of the third-party vendor's observer.
The sort order is a number that is assigned to each observer. The lower the number, the earlier the observer will be executed.
For example, if the third-party vendor's observer has a sort order of 10, the developer's observer would need to have a sort order of 9 or lower.
NEW QUESTION # 29
An Adobe Commerce developer has installed a module from a third-party vendor. This module fires a custom event named third_party_event_after and also defines an observer named third_party_event_after_observer that listens to that event. The developer wants to listen to this custom event in their own module but wants to execute their observer's logic after the third_party_event_after_observer observer has finished executing.
What would the developer do to ensure their observer runs after the observer defined by the third-party module?
- A. Set the sort order of the new observer to be less than that of the third-party vendor's observer.
- B. This is not possible as observers listening to the same event may be invoked in any order.
- C. Ensure the third-party module is listed in the <sequence> node of the developer's module.xmi file.
Answer: B
Explanation:
https://developer.adobe.com/commerce/php/best-practices/extensions/observers/#do-not-rely-on-invocation- order
NEW QUESTION # 30
An Adobe Commerce Developer has written an importer and exporter for a custom entity. The client is using this to modify the exported data and then re-importing the file to batch update the entities.
There is a text attribute, which contains information related to imagery in JSON form, media_gallery. This is not a field that the client wants to change, but the software they are using to edit the exported data seems to be modifying it and not allowing it to import correctly.
How would the developer prevent this?
A) Specify a serializer class for the attribute using the $_transformAttrs class property array for both the exporter and importer so it gets converted:
B) Strip the attribute from the imported file by adding it to the s_strippedAttrs class property array: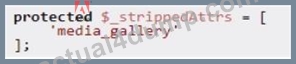
C) Prevent it from being exported by adding it to the $_disat>iedAttrs class property array:
- A. Option B
- B. Option C
- C. Option A
Answer: B
Explanation:
To prevent the media_gallery attribute from being exported as part of the custom entity's data, the developer should add this attribute to the $_disabledAttrs class property array. This effectively excludes the attribute from the export process, ensuring that it does not appear in the exported file and thus will not be modified or re-imported inadvertently.
Option C is correct for the following reasons:
* Preventing Export with $_disabledAttrs:Adding media_gallery to the $_disabledAttrs array tells the system to skip this attribute during export. This prevents the attribute from being included in the export file, thus removing the risk of it being altered by external software that handles the file. Since the attribute will not be present in the exported data, it will remain unchanged in the database when re- importing.
* Explanation: The $_disabledAttrs property is specifically designed to exclude certain attributes from the export process. By using this property, you ensure that attributes not intended for editing or visibility in exports are safely omitted, maintaining data integrity.
* References: The Adobe Commerce documentation on import/export processes outlines how
$_disabledAttrs can be used to filter out sensitive or unnecessary attributes from export files.
* Alternative Options and Their Limitations:
* Option A: Using $_transformAttrs with a serializer is useful for encoding or decoding attribute data during export/import, but it does not prevent the attribute from being included in the export.
This would only help if the media_gallery data needed transformation, not exclusion.
* Option B: $_strippedAttrs is applicable for filtering attributes from the imported file, not the exported file. It would not stop the attribute from being included in the export and hence does not align with the need to prevent modifications during export.
By configuring $_disabledAttrs, the developer effectively ensures the media_gallery attribute remains unmodified by preventing it from being included in export files altogether.
NEW QUESTION # 31
On an Adobe Commerce Cloud platform, in which order does the ECE-Tools package apply patches?
- A. 1. Custom patches in the /m2-hotfixes directory in alphabetical order by patch name.
2. All required Magento patches included in the Cloud Patches for Commerce package.
3. Selected optional Magento patches included in the Quality Patches Tool. - B. 1. All required Magento patches included in the Cloud Patches for Commerce package.
2. Custom patches in the /m2-hotfixes directory in alphabetical order by patch name.
3. Selected optional Magento patches included in the Quality Patches Tool. - C. 1. All required Magento patches included in the Cloud Patches for Commerce package.
2. Selected optional Magento patches included in the Quality Patches Tool.
3. Custom patches in the /m2-hotfixes directory in alphabetical order by patch name.
Answer: C
Explanation:
The order in which the ECE-Tools package applies patches is as follows:
* All required Magento patches included in the Cloud Patches for Commerce package.
* Selected optional Magento patches included in the Quality Patches Tool.
* Custom patches in the /m2-hotfixes directory in alphabetical order by patch name.
The ECE-Tools package is a set of scripts and tools designed to manage and deploy Adobe Commerce Cloud projects. The Cloud Patches for Commerce package is a dependency of ECE-Tools that provides a set of required patches for Magento core issues that affect Adobe Commerce Cloud functionality. The Quality Patches Tool is an optional tool that allows developers to apply individual patches for specific Magento issues without waiting for a full product release. The /m2-hotfixes directory is a directory where developers can place their own custom patches for their Adobe Commerce Cloud projects. Verified References: [Magento 2.4 DevDocs]
NEW QUESTION # 32
An Adobe Commerce developer is working on a Magento 2 instance which contains a B2C and a B2B website, each of which contains 3 different store views for English, Welsh, and French language users. The developer is tasked with adding a link between the B2C and B2B websites using a generic link template which is used throughout the sites, but wants these links to display in English regardless of the store view.
The developer creates a custom block for use with this template, before rendering sets the translate locale and begins environment emulation using the following code:
They find that the template text is still being translated into each stores language. Why does this occur?
- A. setLocate() does not change translation locale after it has been initially set, the $this->_translate->emulate($newLocaiecode) method exists to temporarily modify this by pushing the new locale to the top of the current emuiatedLocales stack.
- B. startEnvironmentEmuiation() resets the translation locale to the one of the emulated stores, which overrides the locale the developer has set when the order of setLocate and startEnvironmentEmulation is used as displayed above.
- C. startEnvironmffntEmulation() SetS and locks the locale by Using the setLocale() Optional Second $lock parameter, i.e. setLocale($newLocaleCode, true), to override and lock the locale of the emulated store. If this is set and locked initially then the environment emulation will not be able to override this.
Answer: B
Explanation:
The startEnvironmentEmulation() method resets the translation locale to the one of the emulated stores, which overrides the locale the developer has set when the order of setLocale() and startEnvironmentEmulation() is used as displayed above.
The correct way to achieve the desired result is to use the emulate() method to temporarily modify the translation locale. The following code shows how to do this:
PHP
$this->_translate->emulate('en_US');
// Render the template
$this->_translate->revert();
This code will set the translation locale to English before rendering the template, and then revert the locale back to the default value after the template has been rendered.
The startEnvironmentEmulation() method is used to emulate a different store view or website. This can be useful for testing purposes, or for developing features that need to work in different environments.
The emulate() method is used to temporarily modify the translation locale. This can be useful for rendering templates in a specific language, or for testing features that need to work in different languages.
NEW QUESTION # 33
An Adobe Commerce developer is working on a module to manage custom brand entities and wants to replicate the following SQL query using SearchCriteria:
- A.

- B.
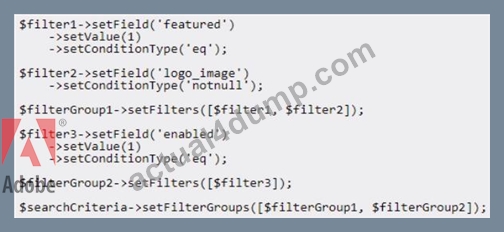
- C.
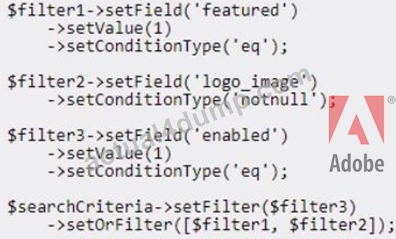
Answer: B
Explanation:
The correct answer is Option A. This approach uses two filter groups to correctly implement the logic from the SQL query using Magento's SearchCriteria API.
* Understanding the Logic: The given SQL query contains two main conditions:
* featured = 1 AND logo_image IS NOT NULL (grouped together with an AND condition)
* enabled = 1
In the Magento SearchCriteria terms, these translate to:
* Filter Group 1: featured = 1 AND logo_image IS NOT NULL
* Filter Group 2: enabled = 1
The two filter groups are then combined using an implicit AND condition.
* Magento's SearchCriteria Structure: The SearchCriteria object is the recommended way in Magento
2 to filter and retrieve collections with complex conditions.
* Filter Groups: Used to group filters together. All filters within a filter group are combined with an AND condition.
* Filters: Define a condition for a single field.
* Explanation of the Code for Option A:
* Filter 1 is created for the featured field, set to 1 with an eq condition type.
* Filter 2 is created for the logo_image field, with a notnull condition type.
* Both Filter 1 and Filter 2 are combined into Filter Group 1, which applies an AND condition between these filters.
* Filter 3 is created for the enabled field, set to 1 with an eq condition type.
* Filter Group 2 contains only Filter 3.
* Finally, both filter groups are set on the SearchCriteria object. By default, the SearchCriteria combines filter groups using an AND condition between them.
* Why Option A is Correct: Option A uses two filter groups that exactly match the desired SQL query logic:
* It correctly combines featured and logo_image in an AND condition.
* It then checks if enabled is 1, which is handled by the second filter group.
* References:
* Search Criteria Builder - This Adobe Commerce documentation page explains how to create and use the SearchCriteriaBuilder.
* Filter Groups and Conditions - Provides an overview of how to structure filter groups and conditions in SearchCriteria.
* Magento 2 APIs - The general documentation for working with Magento 2 APIs, including SearchCriteria.
This approach is the standard method in Adobe Commerce to replicate complex SQL queries using SearchCriteria with multiple filter groups and conditions.
NEW QUESTION # 34
The developer is required to convert a modules database scripts from old install/upgrade setup files to a data patches format and does not want to apply database changes that were already done by install/upgrade scripts.
The current module version is 1.5.4.
What would be the recommended solution to skip changes that were already applied via old format (install/upgrade scripts)?
- A. This is not possible. A module cannot implement both data patch and install scripts.
- B. Implement Patchversioninterface and return 1.5.4 on the getversion() method.
- C. Inside apply() method, check for module version and run the code if version is less than 1.5.4.
Answer: B
Explanation:
According to the Develop data and schema patches guide for Magento 2 developers, data patches are classes that contain data modification instructions. They are defined in a <Vendor>/<Module_Name>/Setup/Patch/Data/<Patch_Name>.php file and implement MagentoFrameworkSetupPatchDataPatchInterface. Data patches can also implement Patchversioninterface to specify the module version that the patch is associated with. The getVersion() method returns the module version as a string. To skip changes that were already applied via old format (install/upgrade scripts), the developer should implement Patchversioninterface and return 1.5.4 on the getVersion() method. This way, the data patch will only be applied if the module version is greater than or equal to 1.5.4. Verified Reference: https://devdocs.magento.com/guides/v2.3/extension-dev-guide/declarative-schema/data-patches.html
NEW QUESTION # 35
The developer is required to convert a modules database scripts from old install/upgrade setup files to a data patches format and does not want to apply database changes that were already done by install/upgrade scripts.
The current module version is 1.5.4.
What would be the recommended solution to skip changes that were already applied via old format (install/upgrade scripts)?
- A. This is not possible. A module cannot implement both data patch and install scripts.
- B. Implement Patchversioninterface and return 1.5.4 on the getversion() method.
- C. Inside apply() method, check for module version and run the code if version is less than 1.5.4.
Answer: B
Explanation:
According to the Develop data and schema patches guide for Magento 2 developers, data patches are classes that contain data modification instructions. They are defined in a
<Vendor>/<Module_Name>/Setup/Patch/Data/<Patch_Name>.php file and implement MagentoFrameworkSetupPatchDataPatchInterface. Data patches can also implement Patchversioninterface to specify the module version that the patch is associated with. The getVersion() method returns the module version as a string. To skip changes that were already applied via old format (install/upgrade scripts), the developer should implement Patchversioninterface and return 1.5.4 on the getVersion() method. This way, the data patch will only be applied if the module version is greater than or equal to 1.5.4. Verified References:
https://devdocs.magento.com/guides/v2.3/extension-dev-guide/declarative-schema/data-patches.html
NEW QUESTION # 36
An international merchant is complaining that changes are taking too long to be reflected on the frontend after a full product import.
Thinking it may be database issues, the Adobe Commerce developer collects the following entity counts:
* Categories: 900
* Products: 300k
* Customers: 700k
* Customer groups : 106
* Orders: 1600k
* Invoices: 500k
* Creditmemos: 50k
* Websites : 15
* Stores : 45
What is a probable cause for this?
- A. The combination of the number of products, categories and stores is too big. This leads to a huge amount of values being stored in the flat catalog indexes which are too large to be processed at a normal speed.
- B. The combination of the number of products, customer groups and websites is too big. This leads to a huge amount of values being stored in the price index which is too large to be processed at a normal speed.
- C. The combination of the number of orders, customers, invoices and creditmemos is too big. This leads to a huge amount of values being stored in the customer grid index which is too large to be processed at a normal speed.
Answer: B
Explanation:
The probable cause for the delay in reflecting the changes on the frontend after a full product import is the combination of the number of products, customer groups and websites. This leads to a huge amount of values being stored in the price index which is too large to be processed at a normal speed. The price index calculates the final price of each product for each customer group and website, taking into account various factors such as tax, discounts, catalog price rules, etc. When there are many products, customer groups and websites, the price index becomes very complex and time-consuming to update. Verified References: [Magento 2.4 DevDocs] [Magento Stack Exchange]
NEW QUESTION # 37
......
Adobe AD0-E716 Exam Syllabus Topics:
| Topic | Details |
|---|---|
| Topic 1 |
|
| Topic 2 |
|
| Topic 3 |
|
| Topic 4 |
|
| Topic 5 |
|
| Topic 6 |
|
| Topic 7 |
|
Latest 100% Passing Guarantee - Brilliant AD0-E716 Exam Questions PDF: https://whizlabs.actual4dump.com/Adobe/AD0-E716-actualtests-dumps.html